Showing posts with label knitting. Show all posts

Sunday, 26 October 2008

knitted arm warmers

    Hands Up!

The Voodoo put in a request for arm warmers and since I’d said out aloud, many times, how much I’d enjoyed knitting in the round I couldn’t say "no". So I knitted her these.

I have posted the pattern I devised to knit them as my small contribution to the generous community of knitters out there who, are committed to the free-for-all digital dissemination of their craft and genius. Long may their ideas be woven in hyperlinks, mirrored and archived in the continuum that is the internet.

knitted arm warmers

Materials (to fit UK size8):

  • 3 balls Jaeger Matchmaker Merino 4ply, shade 639 (actually 2 and ever such a little bit of the third)

  • 1 set 2.5mm double pointed knitting needles
Cast on 78 stitches. Divide the stitches equally on three needles (26 stitches per needle).
Mark first stitch by knotting through a scrap of different coloured yarn. Knit 1, purl 1 for 8"
Next round: *k1, p1, rep from * for 14 stitches, k2tog, p2tog, *k1, pl, rep from * for 36 stitches, ssk, ssk (if you can figure it out, purl these stitches together through the back loops, if not just knit them),*k1, p1, rep from * for 14 stitches
Then knit 1, purl 1 for 1"
Next round: *k1, p1, rep from * for 12 stitches, k2tog, p2tog, *k1, pl, rep from * for 36 stitches, ssk, ssk ,*k1, p1, rep from * for 12 stitches
Then knit 1, purl 1 for 1"
Next round: *k1, p1, rep from * for 12 stitches, k2tog, p2tog, *k1, pl, rep from * for 32 stitches, ssk, ssk ,*k1, p1, rep from * for 12 stitches
Then knit 1, purl 1 for 1"
Next round: *k1, p1, rep from * for 10 stitches, k2tog, p2tog, *k1, pl, rep from * for 32 stitches, ssk, ssk ,*k1, p1, rep from * for 10 stitches
Then knit 1, purl 1 for 1"
Next round: *k1, p1, rep from * for 10 stitches, k2tog, p2tog, *k1, pl, rep from * for 28 stitches, ssk, ssk ,*k1, p1, rep from * for 10 stitches
Then knit 1, purl 1 for 1"
Next round: *k1, p1, rep from * for 8 stitches, k2tog, p2tog, *k1, pl, rep from * for 28 stitches, ssk, ssk ,*k1, p1, rep from * for 8 stitches
Then knit 1, purl 1 for 2"
At this point the ribbed cuff should measure 15” Make sure the stitches are arranged as follows: from start stitch needle1 = 14 stitches; needle2 = 14 stitches; needle3 = 24stiches
Knit 1 round
Then k8, k2tog, k8, k2tog, k8, k24
Knit 1 row
Then k8, k2tog, k6, k2tog, k8, k24
Then knit until stocking stitch fabric measures 1" from ribbed cuff

For Right Hand
To start to shape the thumb, knit round to end of needle2 then increase 1.Continue working in rounds but between the end stitch on needle3 and the start stitch on needle1 increase 1 stitch on the first and last stitch, on alternate rows until there are 16 new stitches between the end and start stitches. Transfer these 16 stitches plus the end and start stitches onto a stitch holder.
Then beginning on needle1 cast on 1(site of thumb opening),knit to end of needle3 and increase 1.
Knit for 1”
Then knit 1, purl 1 for 1" and cast off loosely.
To finish thumb: carefully transfer stitches from stitch holder to needles. Divide the stitches equally on three needles (6 stitches per needle).
Knit to end of needle3 then pick up 4 stiches at site of thumb opening on the palm of the glove ensuring that there are no holes at this point.
Continue in rounds for ¾”
Then knit 1, purl 1 for 1/2" and cast off loosely.

For Left Hand
To start to shape the thumb, knit round to end of needle3 then increase 1.Continue working in rounds but between the end stitch on needle2 and the start stitch on needle3 increase 1 stitch on the first and last stitch, on alternate rows until there are 16 new stitches between the end and start stitches having knitted to the end of needle3. Transfer these 16 stitches plus the end and start stitches onto a stitch holder.
Then beginning on needle1 knit to end of needle2 increase 2 stitches (site of thumb opening), knit to end of needle3.
Knit for 1”
Then knit 1, purl 1 for 1" and cast off loosely.
To finish thumb: carefully transfer stitches from stitch holder to needles. Divide the stitches equally on three needles (6 stitches per needle).
Knit to end of needle3 then pick up 4 stiches at site of thumb opening on the palm of the glove ensuring that there are no holes at this point.
Continue in rounds for ¾”
Then knit 1, purl 1 for 1/2" and cast off loosely.


BACK

Wednesday, 11 June 2008

knitted socks

    Queer Socks

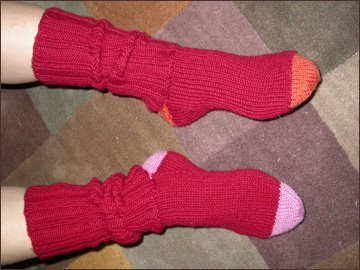
I followed the, stoical guidance of Pam Allen’s ‘Knitting for Dummies’ no-frills Basic Socks pattern for my first attempt at knitting in the round. And, true to the pattern, they be socks*. Odd socks of course.

To be frank I am chuffed. What I like about the socks is that they are substantially more 3D and constructed than my earlier scarf projects. Seeing a sock literally grow on the end of your knitting sticks is entrancing. In gas bill terms, since they are as thrifty as boiling a kettle filled with just enough water for the number of cups of tea required, one can never have too many woolly socks for pootling about in. Me thinks I’ll be knitting more.

*For those techie knitters out there I used 4x50g balls Jaeger Extra Fine Merino Chunky, shade 023 - Red Ink and Debbie Bliss merino dk scraps for the heels.

knitted socks

At the same time as I was working on the Basic Socks I ploughed through making this pair in Regia 4ply sock wool that I’d been given by a well-meaning mate as encouragement. I followed the free pattern that came with the wool.I was frustrated by the yarn repeatedly petering out and having to start new lengths, holding the loose ends for a round or so to maintain the tension and prevent holes forming! In truth I was underwhelmed by the colours and combination thereof and the ONLY thing that kept me going to the end was the prospect of learning how to graft the toe.

BACK

Saturday, 1 September 2007

Double Seed Stitch
   I <3 Double Seed Stitch

To date, I’ve learnt the most about knitting by working through ‘Knitting for Dummies’ by Pam Allen. Though its down-home, no-frills layout is a little bit head scarf & house coat, it delivers clear, concise, easy-to-follow instructions so here I must give the manual its due credit.

            ♥ ♥ ♥ ♥ ♥ ♥ ♥ ♥ ♥ ♥ ♥ ♥ ♥ ♥ ♥ ♥ ♥ ♥ ♥ ♥ ♥


The manual's flat-toned, grey image of a swatch of double seed stitch does nothing to impart the deep, tactile texture created by the offset double-repeat plain and purl stitches of this decorative pattern that pile up to form a quaint, coded fabric of integral, iconic heart-shaped bumps. True to its pragmatic sublimity the manual makes much of the fact that the fabric, “worked in a balanced manner” is “stable” and therefore lays flat with no inclination to curl at the edges.

            ♥ ♥ ♥ ♥ ♥ ♥ ♥ ♥ ♥ ♥ ♥ ♥ ♥ ♥ ♥ ♥ ♥ ♥ ♥ ♥ ♥


To knit this scarf I used:

6 x 50g balls Jaeger Extra Fine Merino Chunky, shade 028 Teal
4.5mm needles

To knit in double seed stitch:

Cast on (or any multiple of 4 stitches, plus 2).
Rows 1 and 4: *k1, p1; rep from * to end of row (end k1).
Rows 2 and 3: *p1, k1; rep* to end of row (end p1).
Repeat rows 1-4 until you have a scarf of your required length.

BACK

Friday, 27 July 2007

Seed Stitch Pom-pom Scarf
   Seed Stitch Pom-Pom Scarf

Aside from the fact that the publication of ‘ Stitch ‘N Bitch: The Knitter’s Handbook’ and a plethora of spin off manuals allows you, should you simply want to try your hand at knitting, to neatly by-pass any hoary, matriarchal rite of passage preparing young girls for womanhood and marriage, you can now, with a knitting project in your hands, watch much as telly as you like, GUILT-FREE.

To knit this scarf I used:

  • 2 x 50g balls Jaeger Baby Merino DK shade 226 - Ocean
  • 2 x 50g balls Jaeger Baby Merino DK shade 232 - Olive
  • 2 x 50g balls Jaeger Baby Merino DK shade 230 - Khaki
  • 1 x 50g ball Debbie Bliss Merino DK, colour 225503 - Gold

To knit in Seed Stitch:
Cast on 48 stitches(or any even number of stitches)
Row 1:*k1, p1; rep from *
Row2: *p1, k1 rep from *
Repeat Rows 1 and 2. I knitted the scarf to wrap twice around a person's neck and terminate immediatley in two neat pom-poms.


BACK

Sunday, 1 July 2007


   Stripey Winter Throat Warmer

I learnt to knit garter stitch as a Brownie. We knitted squares to be sewn into a blanket for a charitable cause. Whoa Louisa May Alcott! Hold those bucolic thoughts of benevolent thrift! This was Zimbabwe-Rhodesia, 1979.

The resulting blanket was truly UGLY as only a project of mean, acrylic yarn remnants garnered from the bottom of knitting baskets at the end of that decade could be: a dropped-stitch riddled patchwork of burnt orange, salmon, bottle green and mustard interspersed with odd squares in new born baby pastels (give or take an occasional crumb of peanut butter and syrup sandwich – a Brownie staple). It was probably palmed off on somebody’s underpaid, disenfranchised maid servant as we upstart, sanctimonious six year olds were congratulated on our magnanimous act of altruism and presented with much coveted knitter interest badges to sew onto our badge sashes.

Years later, under duress, I knitted a toy in garter stitch for a Home Economics class project. I decided on knitting a beige Pink Panther to co-ordinate with the 80’s knotty pine ceiling & mute green walls of my bedroom; because as a teenager mired in white, apartheid South Africa, I exercised my choice to fully test the ambit of straight-laced conventionalism with impassive indifference because there was no access to any promise of anything better.

More years later my third ever attempt at knitting: I have just completed this winter throat warmer as a harbinger of striped deckchair days and the promise of that elusive sun-drenched picnic in St James's park being hustled by the Canada geese for (peanut butter and syrup) sandwich crusts.

    To knit this scarf I used:
  • 3.5mm needles rather than the recommended 4mm

  • 2x 50g balls Debbie Bliss merino dk red 225700

  • 2x 50g balls Debbie Bliss merino dk blue 225203

  • 1x 50g balls Debbie Bliss merino dk grey 225104

  • 1x 50g ball Debbie Bliss merino dk white 225100


I sewed the corsages to badge pins so that they could be removed or positioned where I liked once I had put the scarf on and adjusted it in the mirror. They are also very convenient for disguising the odd unsightly twisted, picked-up dropped stitch or any other unintentional loop, split stitch, hole, knot or irregularity.

BACK

About the fakesters

subscribe to fake-faux

Enter your email address:


Delivered by FeedBurner
  Subscribe to feed
betty woz ere
a day in hand
Real Bread Campaign
Chicken Out! Campaign Sign-up